
Prepare, Save, and Attach an Organizational Chart
The following step-by-step guide is provided to assist filers in preparing and attaching an organizational chart to Form 13H.
An organizational chart attached to Form 13H must be a PDF document. (A document that consists of scanned images of text cannot be read by EDGAR because the content represents a graphic, not searchable text.) In addition, the organizational chart cannot contain excessive formatting or validation errors will result.
The steps to assemble a (simple) organizational chart, save it as a PDF, and use the text recognition feature in Adobe are as follows.
1. Create an Organizational Chart in Microsoft Word
- Open Microsoft Word.
- Select Insert > SmartArt.
- Select a hierarchical structure under Hierarchy; the chart illustrated below as an example is titled “Organizational Chart.”

- Right click in each box to change the Shape Fill to No Fill; Shape Outline to Automatic; or change the font color or size.
2. Save the Organizational Chart as a PDF
After you have completed your organizational chart and ensured it does not contain excessive formatting, save it in Microsoft Word.
Select File > Save As. To convert your chart to PDF, select File > Save as Adobe PDF and rename the file. Ensure your file is named according to EDGAR naming requirements:
- File name must be 32 characters or less.
- All characters must be lowercase.
- File name must start with a letter.
- File name cannot contain any spaces.
- It may contain digits 0-9.
- It may have up to one period (.), one hyphen (-), and one underscore character (_).
3. Use Adobe Acrobat to Recognize Text in the Image
Open Adobe Acrobat Pro DC. Select File > Open > and select your organizational chart. Select View > Tools > Scan & OCR (or Enhance Scans depending on the version of Adobe).

- The Tools Window will display on the right side of the page.
- Under Recognize Text, select In This File.
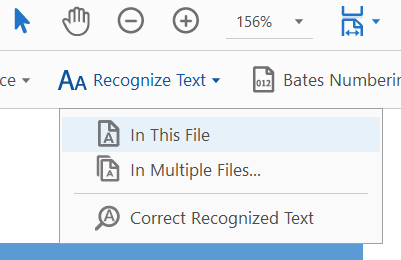
- Select the blue Recognize Text button.

- A progression bar will appear on the bottom right corner of your screen.
- Rename and save your document by choosing Select File > Save As and renaming the file.
4. Attach to 13H Filing
To confirm that your document will pass EDGAR validation,
- Attach the PDF document to your 13H filing by selecting the Add Document button under the Documents List section.
- Browse your computer files and select the organizational chart in PDF you just created to attach it to the 13H filing.

- Put a check mark in the white box next to your uploaded PDF and select Validate Document.
- A “0” should appear in the column marked “Errors.”
- If errors are detected, select the number marked in red in the Errors column to see the list of document errors.
Last Reviewed or Updated: Oct. 31, 2024